
The TD124 Mk II straightforward on the simplest of plinths (I do not use mushrooms!) with
Sumiko tonearm from the nineteen nineties and
Coral M 8 Moving Coil cartridge with Van den Hul tip.
 |
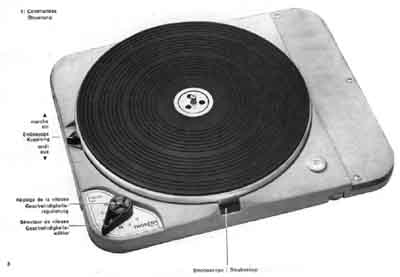
Do you own a Thorens TD 124 or TD 124 Mk2? And do you have the original manual? And maybe you do know a lot about your TD124? So much the better. Maybe this page is not for you. It cannot harm however to look at the images and read some important facts. Many visitors of my website and many Thorens lovers have asked me about the TD124 and TD124Mk2.The Thorens TD124 has an iron cast platter weighing 4.4 kg (+/-). It is driven by a relatively strong 10 Watt motor. (The Garrard 301 has a 16 Watt motor.) The rotation is transmitted via a belt to a stepped pulley. The turning of the stepped pulley is transmitted to the inside of the rim of the platter via a rubber wheel. |
 |
On the left you see the first TD124 with the long SME 3012 arm and the Ortofon SPU-GT cartridge in an early Ortofon headshell with its particular shape. The shell pictured on the left is a later version which is generally known. |
 |
It is a combination of a belt drive and an idler wheel drive. The TD124 has 4 speeds: 16 2/3, 33 1/3, 45 and 78 RPM. These speeds can be adjusted which is great for people with absolute pitch, for those musicians who want to play along with a recording without having to tune their instruments, and for the playing of shellac records which are not always engraved at 78 RPM but have different speeds up to eighty or even higher RPM. The platter of every TD124 is topped by a light aluminum sub platter. The adaptor for 45 RPM discs is integrated. It has a spring and when you push it lightly and turn it to the right it moves up. When you push it lightly down again and turn it to the left, it will lock and stay put. The pattern of the rubber turntable mat consists of closed rings. |
|
Thorens TD124 Mk2
|
The TD-124Mk2 has a more modern styled frame and the turntable mat has fewer rings which are interrupted and a new arm, the TP.14, which replaces the earlier BTD-125 arm. But the most important aspect is that the app. 4.4kg weighing iron platter could be replaced on request by a 3.6kg platter of aluminum which of course is non magnetic and thus does not attract a heavy moving coil cartridge with a strong magnet. The TD124mk2 was described by R.L. West in his review for HiFi News of July 1966: "The TD.124 has long been recognized as the Rolls-Royce of transcription motors. It is as solidly made as our Garard 301 and 401, but has one or two special features of merit. The Garrard takes it drive from a stepped pulley on the motor via a rubber-tyred ider to the turntable. The Thorens interposes a light flat rubber belt between the motor and a separate stepped pulley which drives the idler. This stepped pulley is solid with the main frame, and so prevents any motor vibration , whatever its direction, from reaching the turntable via the drive. (...) |
 |
The TD-124mk2 was soon recognized as one of the most sophisticated transcription turntables available on the market. Both Bang & Olufsen (B&O) from Denmark and Tandberg's Radiofabrik from Norway choose the TD-124 MkII to be incorporated in the top of their product line and the turntable was adorned with their respective logos. At left the Beogram 3000 with B&O tone arm and cartridge. (Edited picture taken from an advertisement in a Dutch record magazine from 1969.) |
 |
This is a picture taken from the instruction manual of an early TD 124. The armboard did not have a black coating yet. When the 16 2/3 speed was proposed in the mid nineteen fifties many manufacturers incorporated the speed into their gramophones and turntables. Right from the beginning the TD 124 also had 16 2/3 rpm which was meant for recordings containing speech and was really not suitable for high fidelity. Note: The aluminum platter which later could be ordered has only 2 stroboscope rings for 16 2/3 and 33 1/3 respectively. It goes without saying that if you have to adjust the downforce of a cartridge when using an iron platter, you have to place the scale not on a record but directly on the rubber mat to get a more exact reading. If you just turn the counterweight to the desired marking when the arm is away from the platter, or placed on the arm rest, you may have a faulty result! |
 |
The TD-124Mk2 had a more modern look but the combination of a belt driven pulley and a rubber idler wheel of the original TD-124 was of course retained and the heavy platter is turned with the same minimum of wow and practically immeasurable flutter. Rumble values are also exemplary. That is if the bearing functions perfectly well, if the rubber belt is not damaged and not too loose, and if the motor is well de-coupled from the main chassis by three sets of two rubber rings/grommets. The player should be decoupled in some way from its surrounding by means of rubber insulators (originally the mushroom-shaped insulators), or if placed directly on a stand, the stand should have spikes or cones (spikes are preferred). Also the table should be level at all times to function well. |
 |
The design, the sturdy build, the specific features no other turntable had, and the precision with which each and every TD-124 was manufactured, made this turntable about the best a man could get. Serious music lovers and audiophiles alike were very fond of this transcription turntable and combined it with tone arms from Ortofon and SME, and with cartridges from Shure and Ortofon. At left an advertisement from 1961. It was published in the April issue of High Fidelity magazine in the US. By that time Thorens products were import!ed by Elpa Marketing Industries Inc. They also import!ed Revox tape recorders. An advertisment from 1960 did not mention Elpa Marketing yet. The cost of $99.95 for the TD-124 is amazing, at least measured by non-American standards in that era. The dollar was a strong currency with a high exchange rate. $99.95 for a unit to be built in a cabinet or to be mounted on a plinth are peanuts today. The Thorens TD-124 was in the nineteen fifties and sixties what the Technics SP-10Mk3 was for the early nineteen eighties, and to a lesser extent the SP-10 Mk2 for the nineteen seventies - if you consider the variable pitch a necessary feature. It takes some attention and knowledge to keep a TD-124 up and running satisfactorily. The die hards know how to service the mechanism and treat the machine with care, and they eventually substitute one part or another, if necessary: a new idler wheel, a belt, a better spindle and bearing, and maybe a platter. Others just own a TD-124 because they consider it as an antique object and do not bother much about the proper functioning. In any case the paragraphs that follow can give you more insight and ideas in order to fully enjoy the working of this turntable. |
|
|
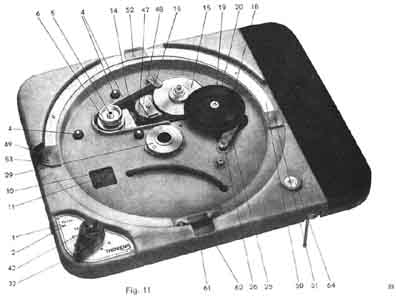
The platter of the TD-124 fits directly on the flange on the top of the spindle and is secured by three screws. |
 |
The aluminum platter does not have the same shape in the center. It needs an intermediate disc to fill up the original space between flange and platter. The intermediate disc is secured by the three original, large screws. The platter is fixed to this intermediate disc with three smaller screws. |
 |
This is a drawing to portray the design of the heavy main bearing and shaft without which the turntable does not have the high end quality. The precision turned spindle is polished to the n-th degree and fits with a low tolerance in the 2 sinter bronze sleeve bearings. If the bearing needs maintenance, it should be cleaned with oil. The earliest TD124 turntables had teflon sleeve bearings which needed to be cleaned with methylated spirit (blue alcohol) if cleaning was necessary. * 초기형 (mk-1 s/n 1~15000)은 테프론 슬리브 부싱 이므로 메틸알콜 로 깨끗히 청소하고 오일을 주입한다. |
 |
If the bearing and the shaft are not handled well, the specifications will not be met. It is of the utmost importance that the housing is hermetically closed at the bottom so that the oil can not leak and the spindle hangs as it were in the oil bath so it is perfectly centered and is turning evenly. |
 |
The ball was kept in place by a circlip (a washer which is a ring of thin, flexible metal) which clamps into the cavity at the bottom of the shaft. This cavity was greased with dark reddish bearing grease. That was the case with the second hand TD-124 (Mk 1) which I bought in 1978. Later models do not have this grease bearing. |
 |
If the oil can leak, the spindle is not supported evenly by the oil and cannot do its job properly. The bearing housing has a base plate at the bottom which must be screwed tightly. In between the housing and the base plate (spindle support pad) a gasket takes care of the complete fitting of the base plate without any leakage. In the drawing it is the thin layer which protrudes at the sides. The original gasket is of a thin material with a brown color. It is a delicate fabric and breaks easily. This gasket can easily be replaced by a gasket that you can cut out of a not too thin but at the same time rather soft transparent sleeve for protection of record covers. You also can use the same sort of transparent plastic, the kind table covers/cloths are made of. This gasket should be larger in diameter than the base plate so that you can trim it to size once the base plate has been screwed on the housing/chamber. Maintenance is important. Clean the bearing and the shaft with oil. Cut a new circular gasket out of the plastic sheet. Put it on the bottom of the still empty housing and with the end of a pair of scissors you make the three holes. Just a small hole will suffice and work better than a large hole. Now put the original, gray, plastic bearing plate (which supports the ball) in the housing. Then put on the plastic gasket with the holes right on the spots were the screws will be inserted. Put the base plate on and insert the 3 screws. Fasten the screws carefully and fasten them tightly. Replace the housing in the chassis of the TD124. Fill it with oil for about 1/3 and gently place the spindle (the platter attached to it) in the shaft and let it slowly settle by itself. Do not force the spindle to go down. -> 엔진오일 SAE 20 사용 |
 |
In case you have bought a new spindle and bearing from Schopper in Switzerland, or have to exchange another set of spindle and bearing from another table as a replacement, or have disconnected the spindle from the platter yourself, you would need a measuring instrument to calibrate the platter the way it was done in the Thorens factory. Naturally the calibrating was done on the inside of the rim, there, where the idler wheel touches the platter and where the precise centering is the most effective. In the picture at left it is shown how it was done. |
 |
How do you center the platter as precisely as you can? Many of you owners have of course found out the best method of checking the correct centering of the platter. It is easy. But you need a carpenter's eye. |
 |
This drawing is from the original manual and tells you how the adjustments of the idler wheel in the first model of the TD124 should be made. In the TD124Mk2 there are no rings on top of the idler wheel. If your TD124 works perfectly well and you see to it that the adjustments are right, than there is obviously no need to make changes. The well functioning also depends on other adjustments and the cleaning of some rotating parts. |
|
|
This image shows the cut out diagram as it accompanies the original manual. If you order a copy of the manual the drawing will be included so you can enlarge it yourself. But you also can order a real size diagram (scroll down for details).
|
 |
This is what the original motor looks like. This motor was taken of an old machine which could not be restored. one shaft for the suspension was broken and the aluminum plate mounted between pulley and motor is missing too. A short time after the introduction of the Acoustic Research turntable with the floating (suspended) chassis, designed by Mitch Cotter, Thorens introduced their version of the belt drive turntable with the floating sub-chassis and named it TD 150 (from which Linn developped their LP12, also inspired when they manufactured the parts for the Ariston sub chassis player). The TD 150 was introduced in 1966. In that same year however, the TD-124Mk2 was launched but manufactured only for a few years and was eventually replaced by the TD 125 which was produced already from 1968 on. |
|
|
For several years the factory had enough spare parts for the TD124 in stock for replacement and servicing. Despite its sturdy built the motor of the TD124 could have worn out if the machine was ill treated or accidentally damaged. In 1977 the factory ran out of motors and a new motor was designed especially for the TD124 by the renown manufacturer Papst. This motor was a so called "Aussenlaufer" with the advantage of the flywheel effect. (A similar type was used in the early Acoustical 3000 turntable.) |
 |
It is possible that you may come across such a fairly new motor. Two different motors were manufactured: kit 3805-200 for 200-240 Volts/50 Hz. kit 3806-110 for 100-125 Volts/60 Hz. |
 |
This picture shows how the rubber isolation rings should be placed in order to attain a maximum isolation. From bottom to top: Hartpapier-Scheibe (hard paper ring), Gummitülle (rubber ring which is inserted in the chassis), Gummitülle (rubber ring), Hartpapierscheibe (hard paper ring), Sprengring (locking ring). Because of the different electrical parameters a new connection diagram was supplied. |
 |
With four insulators shaped as mushrooms, the chassis can be de-coupled mechanically from the plinth. Here you see the original rubber mushrooms. Owners often ask me if new ones are available and where to get these. Browse the www or check eBay.
|
 |
If you cannot obtain them or find that they are too expensive, you can manufacture some insulators yourself from pieces of rubber tube and top these with small rubber discs. Some people just let the chassis rest on the wooden base as I do. But then it is important that the audio rack or cabinet is well de-coupled from its environment by means of spikes or similar gadgets.
|
 |
The main platter has 6 small rubber pads. These are there to support the aluminum top/sub platter in the playing mode. That is when the aluminum top/sub platter is lowered by disconnecting the clutch from it. |
 |
It is possible that the clutch does not work correctly. Maybe the aluminum platter is somewhat round on top, overall, or just partially. In that case it will touch the clutch in the up and in the down position. Or the platter may be slightly concave. If it is extremely concave it may be free from the clutch at all times. Either situation has to be corrected. Put the aluminum sub platter on a glass plate and check if the rim is perfect and its edge is supported perfectly well, all around. Even though it is, it is possible that some changes in the surface can be detected. You can check this better if you unscrew the center 45 RPM adapter. (If you are dismantling this center piece, do note exactly what you have done. This makes it easier to reassemble it.) By taking off the mat you can check the surface better. There should not be any part of the aluminum platter that is lower. If the platter's rim and surface needs correction, you should only make changes if you are really sure that you can do that, and if you are certain that the aluminum top platter is the culprit of the malfunctioning of the clutch system. |
|
|
The clutch has the shape of half of a circle. It is a strip which should not have a bend. Check if the clutch is bent or torted. If it is, flatten it. The clutch can of course be adjusted. The drawing (below) shows the functioning of the device. For better understanding you can save the drawing and view it in detail when necessary. There are three screws with a specific shape. If one or two are missing try to find the same or similar ones with the same diameter and thread. Have one end turned by a machinist exactly to the shape of the original screws. In the playing mode, the holes of the clutch fall over the top end of the screws. That means that the clutch is in the down position. By moving the knob of the clutch away from you, the clutch will be lifted and will rest on top of the screws. This means that the aluminum sub platter is resting on the clutch and is lifted also, just enough to let the main platter turn freely underneath, without constraint. If the platter is not turning freely, the locking nuts have to be turned loose and one or more bolts have to be turned as to protrude more. This adjustment is rather delicate. And you only have to make the adjustment if the strip is not bend and only if the former owner has adjusted the bolts unwisely. When playing a record, the sub platter should never touch the clutch. |


 |
 |
Some people propagate the use of the TD124 without the aluminum sub-platter. Anybody who is doing this is not using the TD124 as this machine is supposed to function. The clutch action which instantly stops and starts the turning of the sub-platter, should always be used. Repeatedly starting and stopping the machine with the speed selector on the left is not advised. It will use the idler wheel excessively. Putting on and taking off a record while the platter is turning is also not the proper thing to do. Just turn on the machine selecting the speed when you start playing records, and then use the clutch action so you can take off the record and put on the next one. Leave the motor and platter turning, even if you play for hours and hours as I sometimes do. Turn the TD124 off when you have finished. French designer Jean-Constant Verdier proposes a "modification" of the sub-platter by which a thin sheet of lead is used. He also proposes the use of lead on various parts of the machine. For instance in order to eliminate vibrations in the armboard. I myself do not apply any lead which can clean up the signal by "separating" it from the turntable. You are of course free to follow his philosophy. What is the use of having an original TD124 if you are modifying it. on top of it, I am not a propagator of using sheets of lead which make the signal dull. The sole "modification" I propose to you is aimed at improving the support of the record and that is by improving the contact between record and turntable mat. Just cut out 18 small pieces of a heavy magazine cover (about 200 gr. paper) and put 2 together. on 9 spots you divide these twins near the edge of the sub-platter. Even better is to cut out a ring of paper and put it under the mat at the periphery. In this way the rubber turntable mat is slightly heightened at the edge, just enough so to fully support any record. Use a special turntable weight(stabilizer) and you will hear the perfect functioning of your TD124 without deviating extremely from the original design. |
|
|
|
1. The rubber idler wheel (A), the pulley of the motor (B) and the pulley (C) which transmits the rotation to the idler wheel should be free of dirt and grease. You can use methylated spirit (blue) for cleaning. (메틸 알콜) 2. The inside of the platter (D) should be cleaned, as well as the belt (E). Here also you can use methylated spirit. 3. The motor could need some oiling through the hole on the side at the bottom (F). While doing this keep the motor as upright as possible. Also at the top of the motor, the shaft (G) likes a few drops of oil which you apply in between the motor and the aluminum, independant top plate which "separates" the pulley from the actual motor. Do not apply too much and do not grease the belt! 4. You can put one drop of oil on the bearing of the idler wheel and one on the bearing of the 4 speed pulley (remove these before oiling). It may be necessary to clean these spindles and bearings well, especially after many years of service.
The cleaning tips of belt, platter and pulley are valid for every turntable, be it a Thorens TD124, 125, 160, 166, 145, 126, etc. or any other make of turntable which is driven by a belt or an idler wheel. |

 5. Some users complain about the fact that the speed is too slow and cannot be adjusted to reach the exact speed, or they complain about the fact that the nominal speed only is effective after more than just 10 minutes. Normally it will take some time for the platter to fully reach the nominal speed. This phenomenon is temperature related and depends on the climate in your country as well as your listening room. (You know that the compliance of your pick up cartridge for instance also depends for a great deal on the room temperature and this does change the character of the sound: more or less openness, rendition of high frequencies, audible distortion, etc.) Right from the start the stroboscope should indicate that the platter is only just a bit slow. If the TD124 does not work right after cleaning and oiling, you can adjust the eddy current break which consists of a magnet in the shape of a half moon (M) and its counterpart (which is part of a circular piece of metal, C).
Adjusting the Eddy Current Brake.
The large pulley is not shown in this drawing. It conceals device (C).
The interaction between (M) and (C) can be varied. This is done by the speed adjustment knob on top of the speed selector (on the left front of the TD124).
The more (C) turns towards the magnet, the stronger the breaking action will be and the slower the speed will be.
If (C) turns away from (M), the breaking effect will be less and the speed will increase.If you have cleaned all parts and oiled the bearings and still the speed does not reach the exact Rounds Per Minute, you should adjust the magnet. First turn the speed adjustment knob in such a position that C is far away from M. Now loosen the screw of the magnet (M) and move the magnet farther away from (C). Just one or two millimeters could suffice. Reinstall the pulley and the platter carefully and check if there is any improvement and adjust the speed with the speed adjustment knob above the speed selector. If you can not reach the nominal speed and if it is still too slow you have to start all over again and further increase the distance between M and C.
If the speed is too fast, than you have gone too far. You have to experiment to find the right position of (M) in relation to (C). Before you start it is wise to turn the speed adjustment knob always in that way that (C) is not direct in front of (M). So you will still have room for more or less breaking when you use the speed adjustment knob.
You should always take the utmost care concerning the shaft and the platter. The platter and shaft (spindle) should not be separated as the connection is precisely calibrated in the factory. Although shaft and bearing can easily be damaged when clumsily putting the shaft back into the bearing, it is advised not to separate platter and shaft. Even though the pressure on the base plate and gasket can be very high when putting back the shaft with platter connected into the bearing.
In case the platter and the shaft have been separated, do take extreme care to center the platter precisely and screw the platter tight to the shaft (spindle). Always fasten the screws evenly, little by little and check if there is eccentricity before you tighten them completely. The slightest eccentricity should be avoided. The actual position can only be achieved by using a special gauge like the workers in the factory originally used (dial gauge).6. If the belt is noisy you can clean the belt and then turn it inside out and use it that way. A new belt and some other spare parts like the rubber rings and an idler wheel could probably be obtained from Rolf Kelch.
If you have a TD124 that works perfectly well, then you are a lucky person. I bought my first TD124 in 1980. Apparently it was not looked after by an expert, so it made quite some noise and had to be attended to attentively. The TD124Mk2 I own now is a perfectly working machine which shows even better specifications than the checklist of Thorens it seems. Wow and flutter are very good and rumble is far better than the -40 dB specified by Thorens originally. You can do a lot to improve the functioning of the TD124. But first of all the rubber rings, belt and idler wheel should be OK.
And there are a few people who have set up a forum where hobbyists and lovers of the Thorens TD-124 talk about the virtues, problems, remedies and solutions. A good thing to consult these forums (fora) if you did not find answers to the problems of a malfunctioning on my page.
'A U D I O > Thorens TD124' 카테고리의 다른 글
| 토렌스 124 vs 가라드 301 (0) | 2008.10.18 |
|---|---|
| (1) TD124 수리 - 오바홀 (0) | 2008.10.18 |
| (2) TD124 수리 - 급유 (0) | 2008.10.18 |
| (3) TD124 수리 - 진동방지 (0) | 2008.10.18 |
| (4) TD124 수리 - 펠트 링 (0) | 2008.10.18 |